
The Run Excel Calculation Model action step takes a set of inputs and iterates through an Excel workbook to generate the specified outputs.
This article will demonstrate how to create the action step and then provide basic instructions on how to use it. We will then demonstrate the functionality of this step in a real-world scenario using a simple example.
Video - Simple Tutorial
Watch our simple video guide to learn the basics of the Run Excel Calculation Model:
WATCH THE VIDEO TUTORIAL (CLICK HERE)
Creating the Step
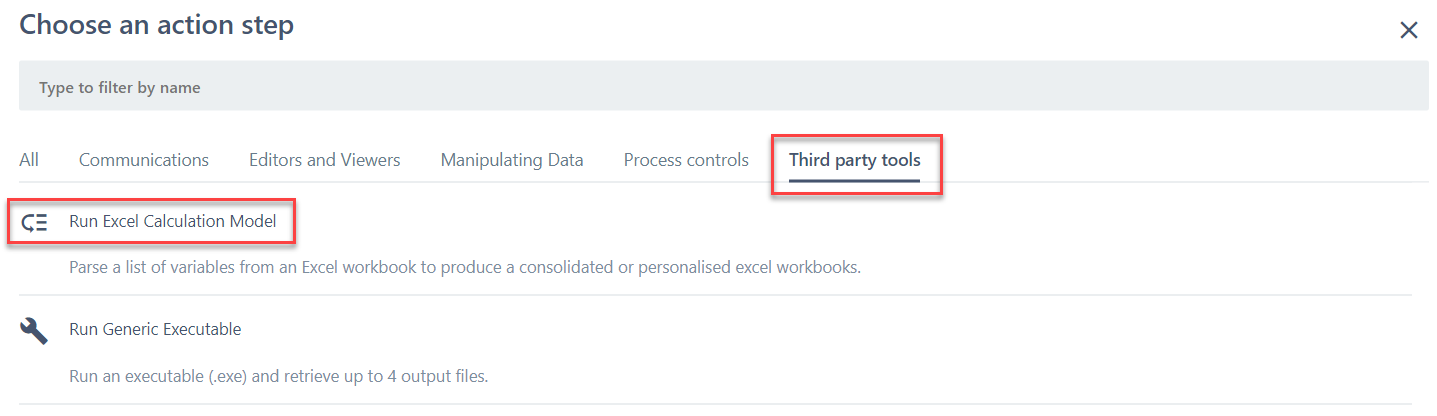
1. Add an action step to the process.
2. Go to the Third-party tools tab and select Run Excel Calculation Model
Using the Step
There are three main components to the "Run Excel Calculation Model" step.
- The first component is the 'Model Set Up', which specifies the source (input) parameters and output range of your calculation model.
- The second component is specifying what actions the step should perform for each input parameter.
- The third component specifies what the step should do with the calculated output.
Model Set Up
The first section requires the user to specify the source/input data and the excel model to be used.
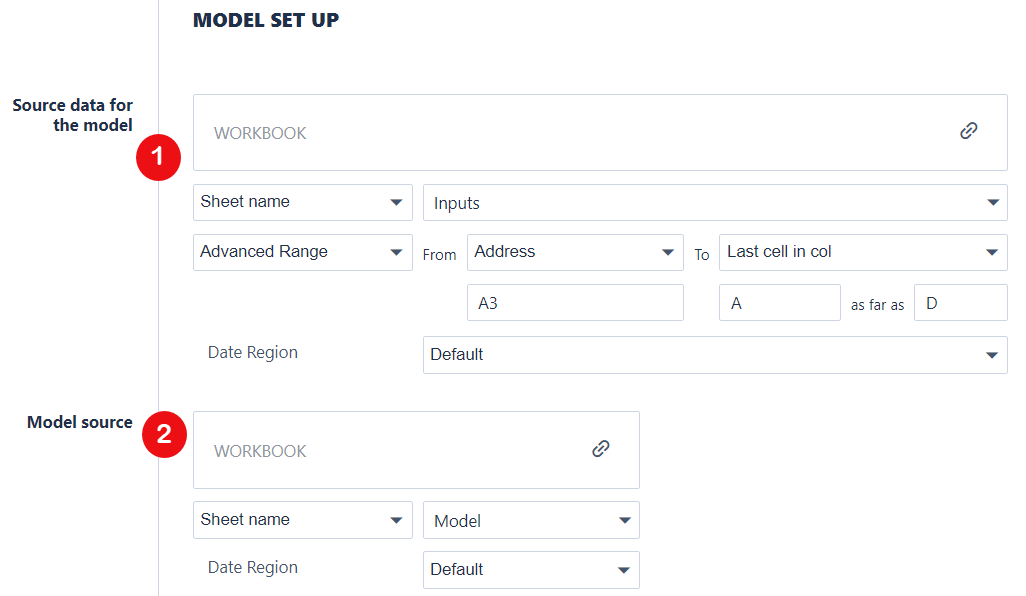
1. Firstly, you will need to link an excel file that holds the source/input data.
- You will then need to provide the range and worksheet that holds the input data.
- Note: this range is what the step will iterate the model over (for each row of data in the input range).
2. Secondly, you will need to link an excel file with a model that can take the input data you specified in Step 1.
- Note: This excel file can be the same as the file in Step 1 if the Worksheet that comprises your model is in the same file as the worksheet that comprises your source, i.e., you don't need two separate files for input data and the model.
Specify Actions to take with each Iteration of the Model
The next part would require you to specify how the step should use the source data for the model.
1. Select an option from two possible actions:
- FROM_MODEL_WORKBOOK (go to step 3 after step 2)
- FROM_SQL_QUERY (go to step 4 after step 2)

2. Click "Add" to add the instruction and configure the instructions according to the option you selected in step 1.
3. "FROM_MODEL_WORKBOOK" will copy the value of a cell from the input source range into a specific cell in the Model Worksheet. When this option is added, you will be presented with the following box to fill in.
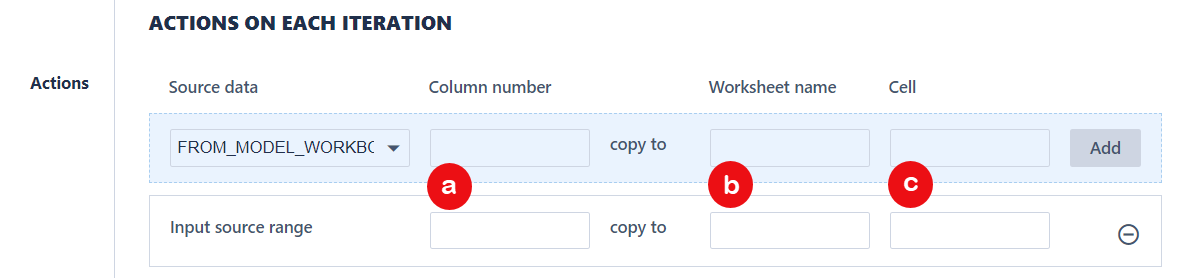
a. Enter the input column number (relative to the input range you entered). For example, if you specified your input range as B1 to D4 and want to use Column B in this instruction, the relative column will be "1".
b. Enter the name of the Worksheet you require the input data to be copied into.
c. Enter the cell (in the Worksheet you entered in b.) that you want the step to copy the input data into for each iteration. Note: You will need to specify the excel cell reference here. For example, "E2".
4. "FROM_SQL_QUERY" will run an SQL query for each row of data. When this option is added, you will be presented with the following box to fill in.
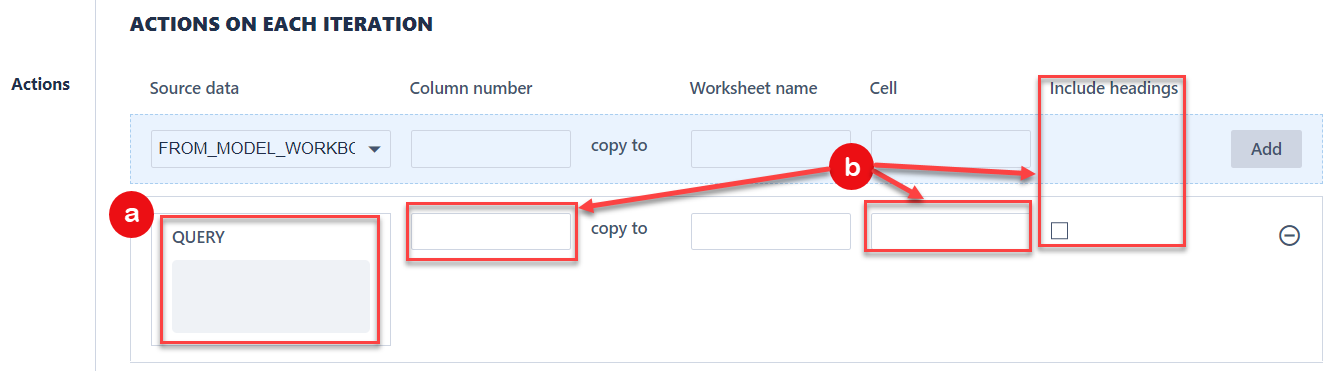
a. Type in an SQL Query that you require. To use the conditions specified in your input data, you will need to provide the column number (offset by -1) and wrap it round "{}" brackets.
For example, if you require your query to use the first column of the input data range as a condition, your query may look like the following.
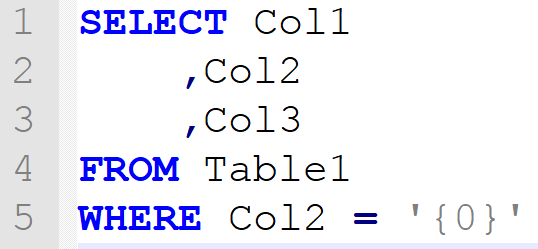
Col2 is a text column in the case above, so the {0} is wrapped with single quotes. Single quotes are not needed for numeric columns.
b. Additionally, the boxes you must fill are similar to those in "FROM_MODEL_WORKBOOK". The differences to note are:
- You can enter multiple column numbers instead of just one using a comma-delimited list of column numbers
- The cell address you specify is the start reference of where the output query will be extracted. For example, if your query produces three columns with four rows of data and you specified the cell "A1". The data will encapsulate the range "A1:C4" or "A1:C5" (if you check the tick box to include the headings of the SQL query).
5. Specify the parameters for each action. These checkboxes are self-explanatory and dependent on user preference.

Producing Outputs from the Model
The final part of this step requires the user to specify how the output files should be created.
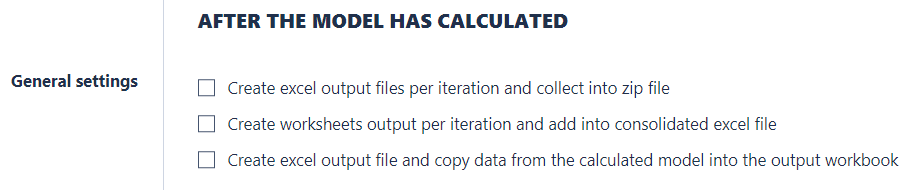
Each checkbox is a different method to obtain your output files, and users can select as many options as preferred. We will go through what the user must supply for each method.
- Create excel output files per iteration and collect them into a zip file:
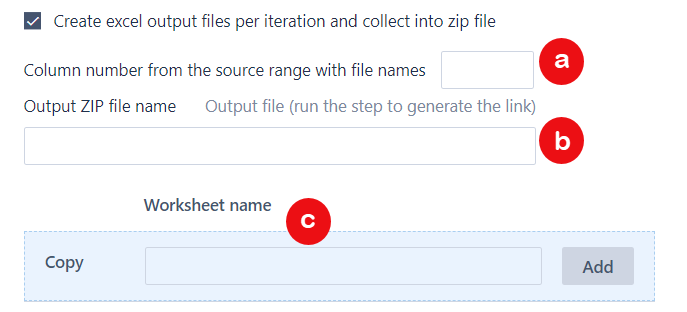
a. The column number from the source range contains the file names
b. The name of the output zip file
c. The name of the output sheet to be copied over. (In general, this is the name of the worksheet you specified in the Model source - in the section "Model Set Up"). Remember to click "Add" after entering the worksheet name.
- Create worksheets output per iteration and add it to the consolidated excel file
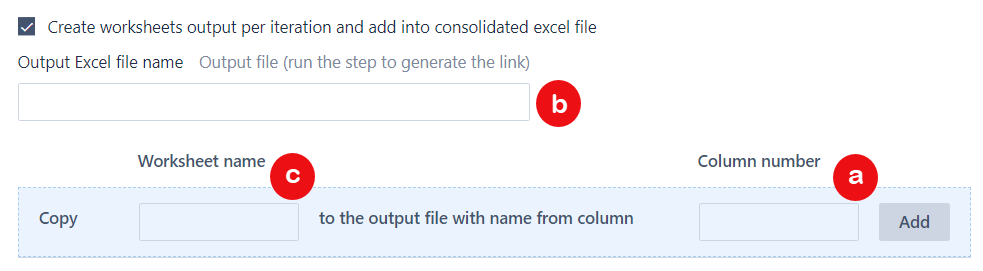
a. The column number from the source range, which contains the file names
b. The name of the output consolidated excel file.
c. The name of the output sheet to be copied over. (In general, this is the name of the worksheet you specified in the Model source - in the section "Model Set Up"). Remember to click "Add" after entering the worksheet name.
- Create an Excel output file and copy data from the calculated model into the output workbook
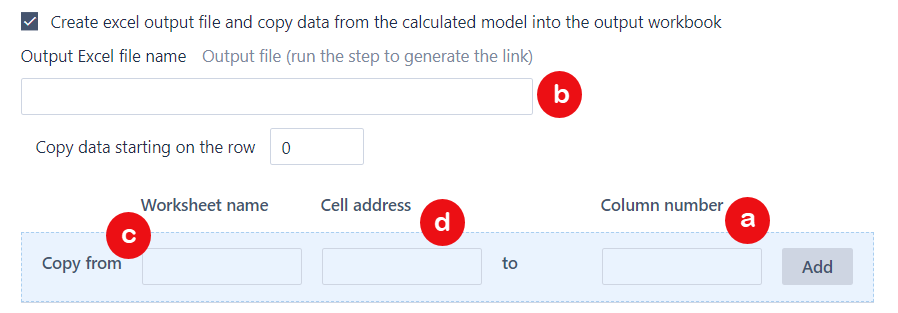
a. The column number from the source range contains the file names
b. The name of the output excel file.
c. The name of the output sheet to be copied over. (In general, this is the name of the worksheet you specified in the Model source - in the section "Model Set Up").
d. The cell ranges that need to be copied. Remember to click "Add" after all the required information.
Example - Interest rate forecast model
Disclaimer: This model will only be used to demonstrate the "Run Excel Calculation Model". Any other use besides its original intention is not supported.
In this section, we will give a short example of using the Run Excel Calculation Model step to predict spot rates for the next 12 months for three different economic scenarios (High-Interest Rates, Medium-Interest Rates, and Low-Interest Rates).
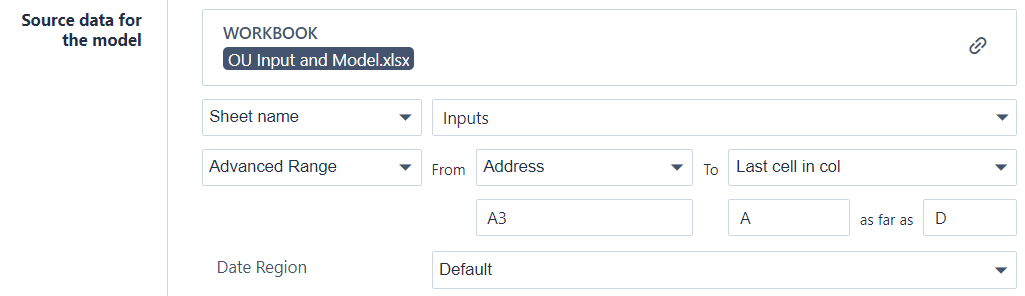
Attached to this article are two excel files to view. The input and model files are stored in "OU Input and Model" and the corresponding output is stored in "OU Scenario Outputs".
If you open the "OU Input and Model" and examine the "Inputs" tab, you should see the following input table.
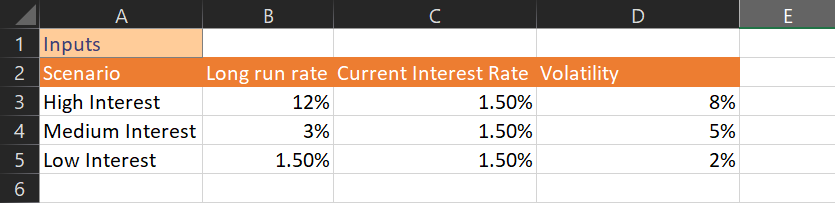
We note that the input data is contained within the range "A3:D5". Hence, we will specify the following information in the source data range.
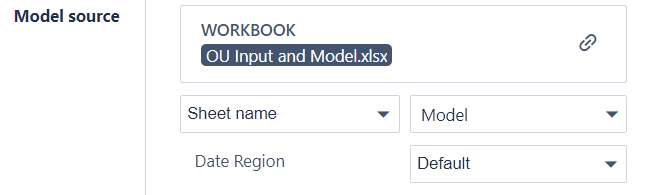
We will now need to specify the name of the Worksheet that contains the model. In this case, the worksheet is named "Model".
If we look at the "Model" worksheet, we see that the input parameters of this Model are held within the range "A2:B4".
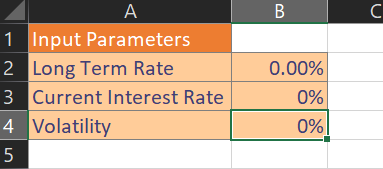
Hence, we specify for each iteration; the step should perform the following instructions with the input data.

We then set the parameters:

Now the remaining step is to determine how the outputs should be presented. In this case, we want to create a worksheet named after each economic scenario and consolidate it into one workbook.
Hence, in the final section, we will put the following details.
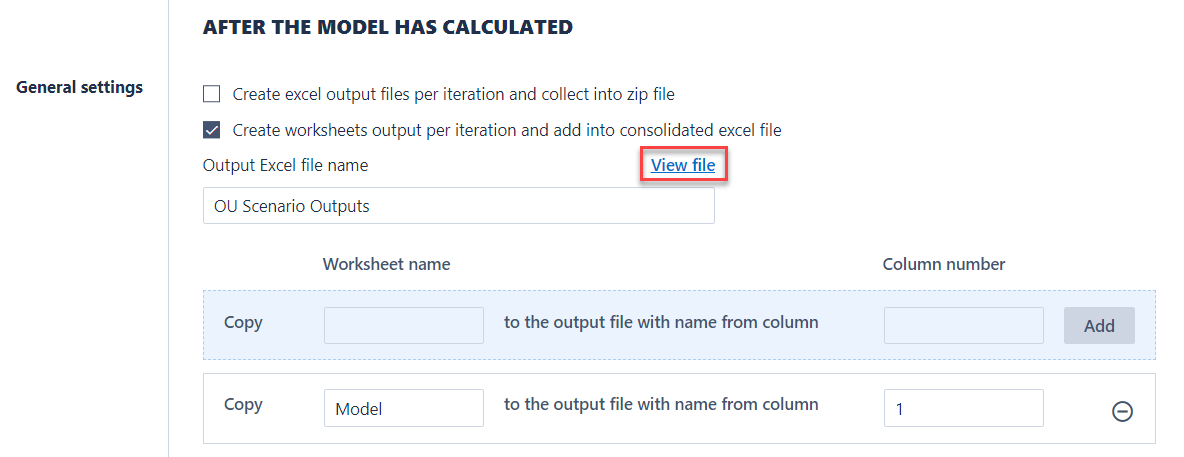
Once we run the step, click "View file" to open the output file.
In the output file, we should see the following worksheets:
![]()
You can confirm that the step was successfully run by comparing your output file with the attached output file "OU Scenario Outputs." For example, the "High Interest" output should be similar to the below image.
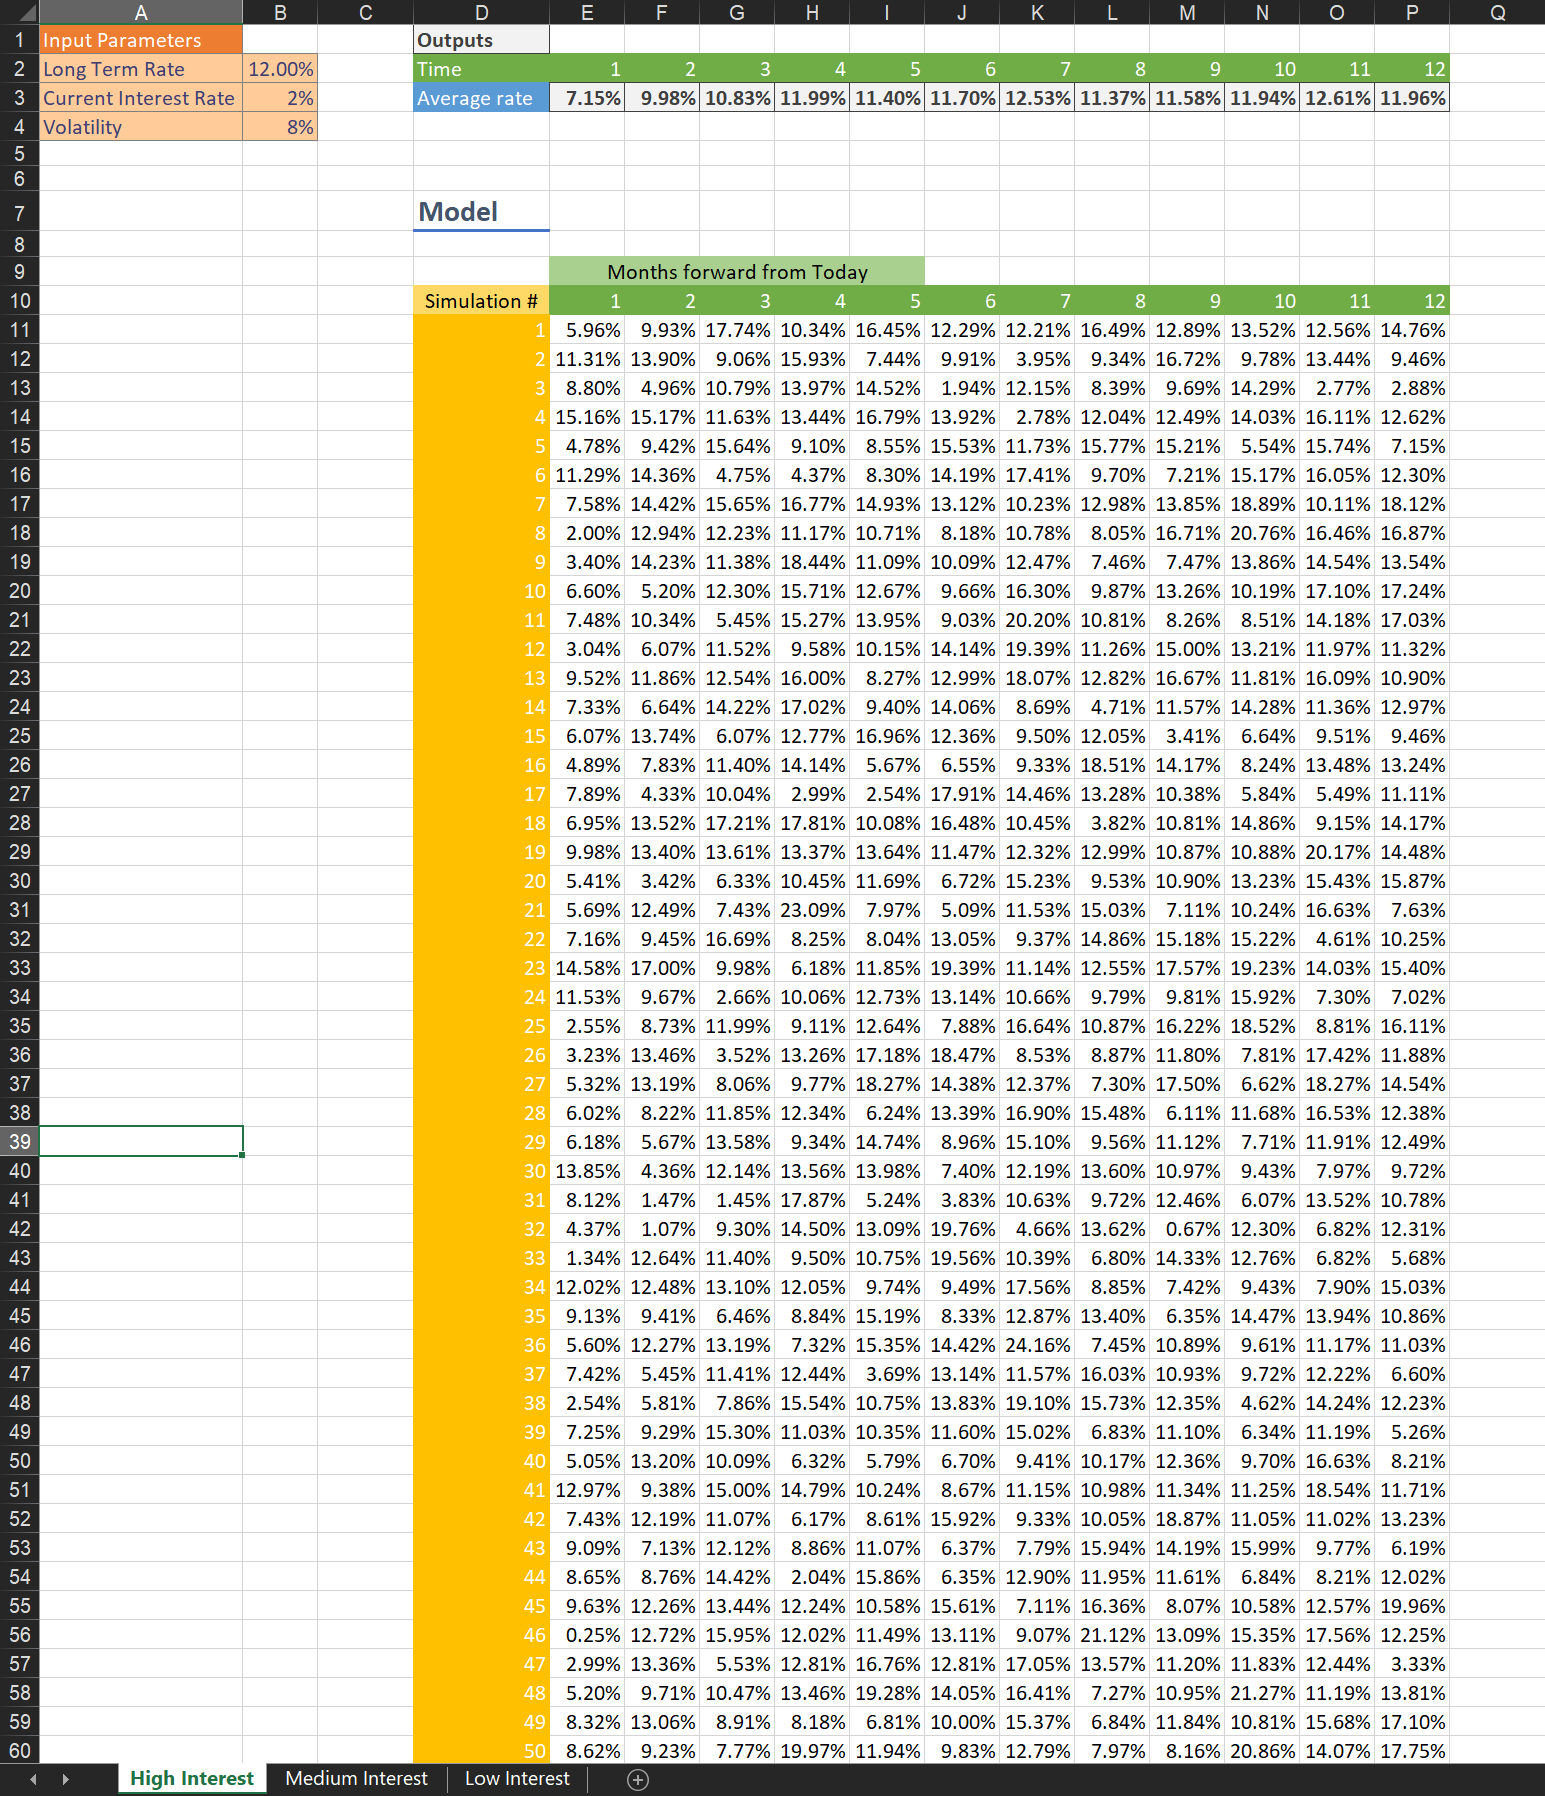
Note: This example involves forecasting spot rates. Therefore, your Outputs may have different values than the output file attached to this article. However, the Input Parameters should be the same as the ones in the desired output file.
Files used in the example:
Comments
0 comments
Please sign in to leave a comment.